Flytrex Introduces Plug-And-Play Installation For DJI Phantom Vision Series
If you are anything like me and more so if you own a DJI Phantom 2 Vision or Vision+, you like RTF (ready to fly) solutions when it comes to quadcopters and gear for the hobby itself. Not having to be handy with the soldering iron is something more and more drone enthusiast prefer. Another aspect of not modifying your quads electronics and messing with its circuit boards is the warranty issue. Most manufacturers will likely void your warranty if you have added your own electronics or let alone opened the unit itself up.
At the same time, flying multirotors is a hobby and as such, most of you probably want to do certain modifications and add devices to your units that provide functionalities they otherwise lack. One such functionality is to be able to track your multicopter real time, while it is up in the air. Of course you can get telemetry data via your WiFi or other downlink, but once that connection is lost, your best bet is something like the “Find My Phantom” function in the Vision app. But once there is no GPS lock either, your device can be miles away from what the app will tell you.
For the benefit of those of you who like to keep your quads original “stock” setup, but would still like to add an advanced tracking device, Flytrex just launched a brand new CAN-BUS adapter for the DJI Phantom 2 Vision and Vision+. With the new adapter, you can install a Live 3G in about 30 seconds, aka plug-and-play.
When used together with the new adapter, the Live 3G transmits and logs new parameters about your flight, including flight mode, compass data, engines status and more. Additional new data will gradually be introduced to the Flytrex systems to give you more and more insight into what’s happening under the “hood”.
Flytrex already has a CAN-BUS Adapter for the A2, WooKong-M, Naza 2 and Phantom 2 which we hope to be able to test soon, as well as the regular Live 3G.
Installation
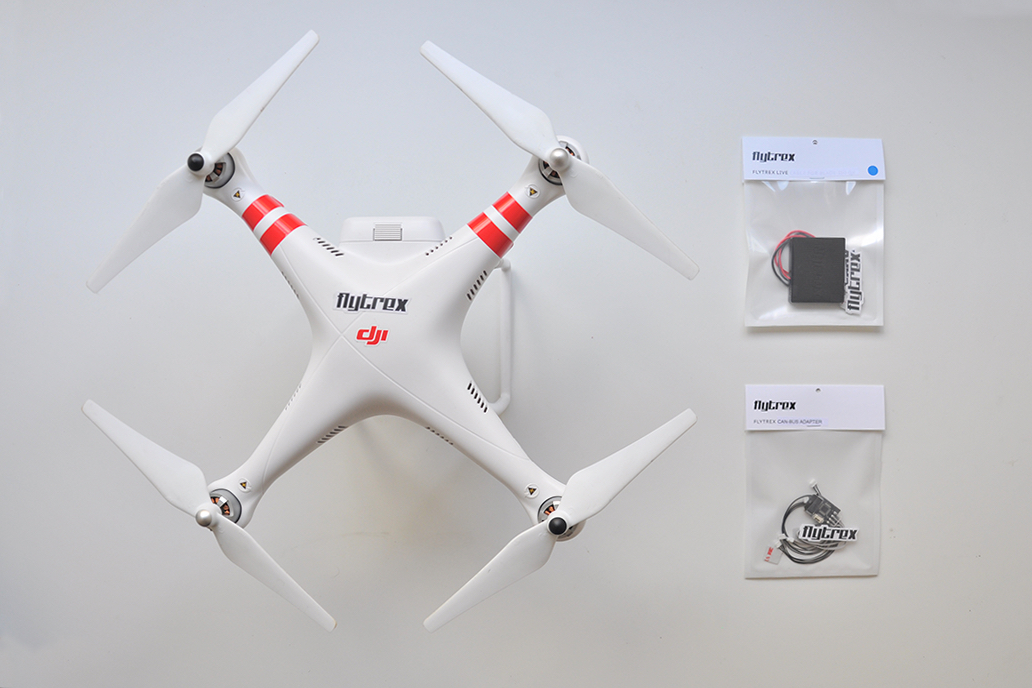
To get started you will need your Phantom 2 Vision Plus quadcopter, your Flytrex Live 3G and the Flytrex P2V/+ CAN-BUS Adapter. When ordering Flytrex Live you will be asked which cable type you wish to include with your order, make sure to select the Flytrex P2V/+ CAN-BUS Adapter, this is a special CAN-BUS Adapter model designed especially for installation with the Phantom 2 Vision and the Phantom 2 Vision Plus.
When installing the Live 3G using this CAN-BUS Adapater installation is 100% plug-and-play, no soldering is required through this manual. Before starting the installation, make sure to register your Live 3G with your Flytrex account since you might have limited access to your Live ID sticker that is placed at the bottom of your Live 3G after installation.
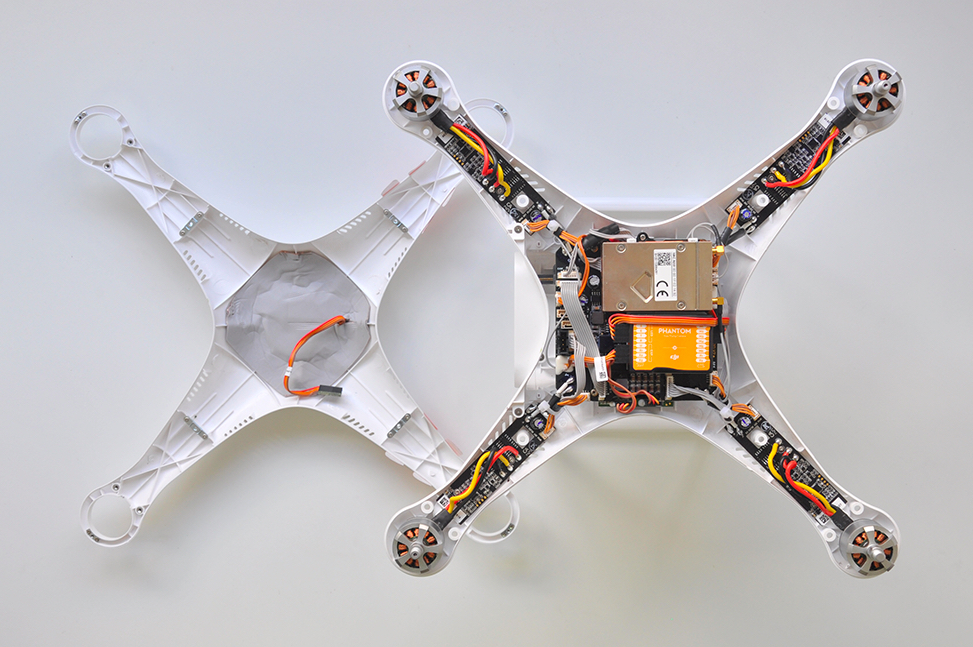
Open Your Phantom
Carefully open your Phantom 2 Vision Plus shell. Pay special attention to the GPS cable that is connected between the top shell and the main board and disconnect it carefully from the main board when opening the top shell. Opening the Phantom is beyond the scope of this manual but you can find plenty of online manuals showing how to open it up. For the purpose of this guide you do not need to remove the landing arms nor the Phantom 2 Vision plus gimbal.
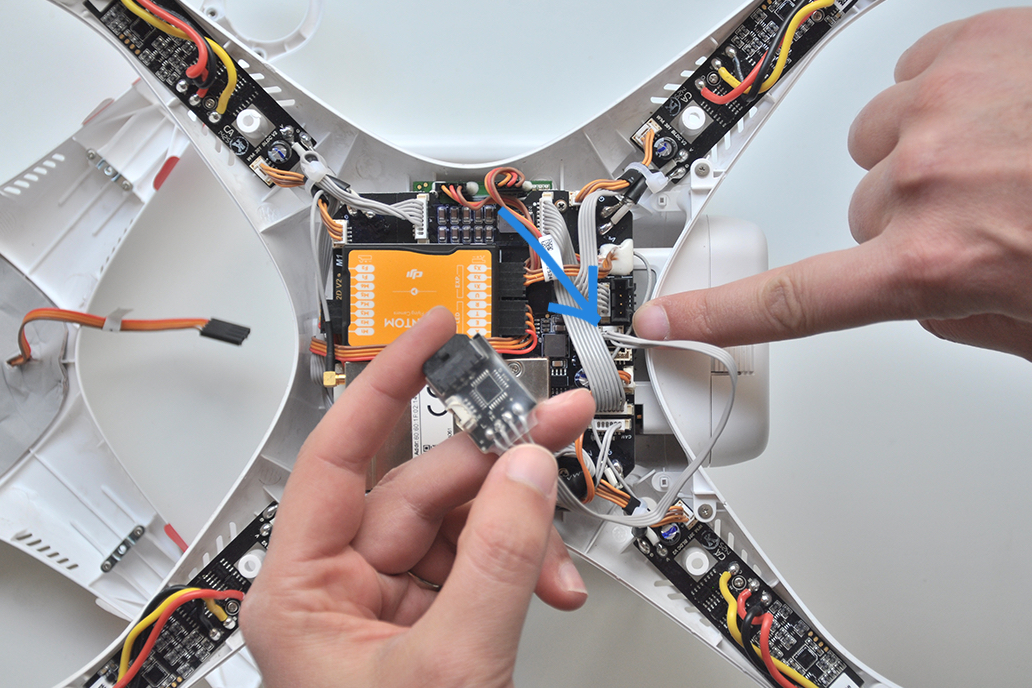
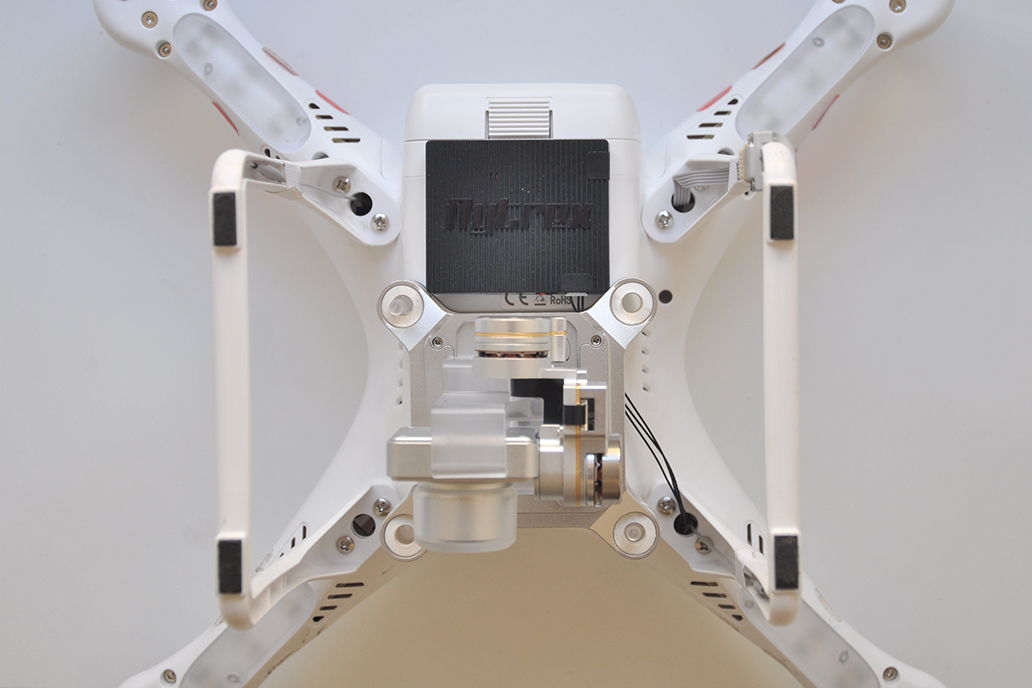
Connect CAN-BUS Adapter to Main Board
Connect the Flytrex CAN-BUS Adapter to the Phantom 2 Vision Plus main board CAN-BUS socket. You will find the free CAN-BUS socket on the main board as seen in the picture below.
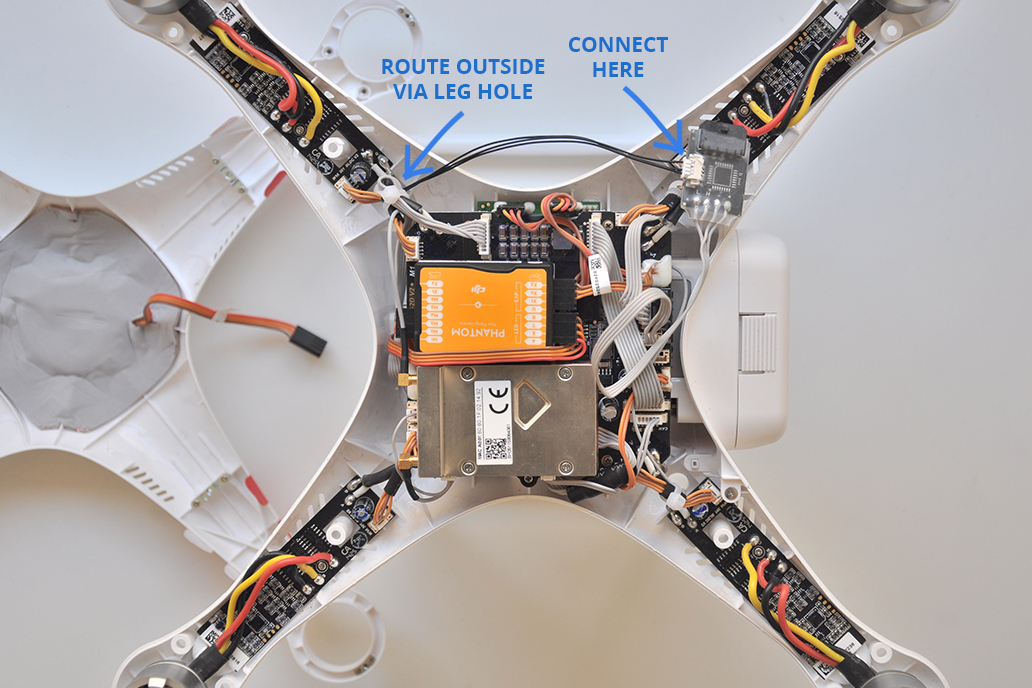
Connect CAN-BUS Flytrex Live Installation Wire
Your CAN-BUS Adapter package also includes two black colored cables. This cable is used to connect between the CAN-BUS Adapter and your Flytrex Live 3G. You will only need one of these cables, the second is provided as spare cable just in case.
Route one side of the cable through one of the leg built-in holes from the outer side to the inner side of the Phantom shell and connect it to the side socket on the CAN-BUS Adapter. Once done, you should have one side of this cable routed to the outer side of the shell and the other side connected to the CAN-BUS Adapter. That’s all the connections we’ll need inside the Phantom and you can carefully close back the Phantom shell.
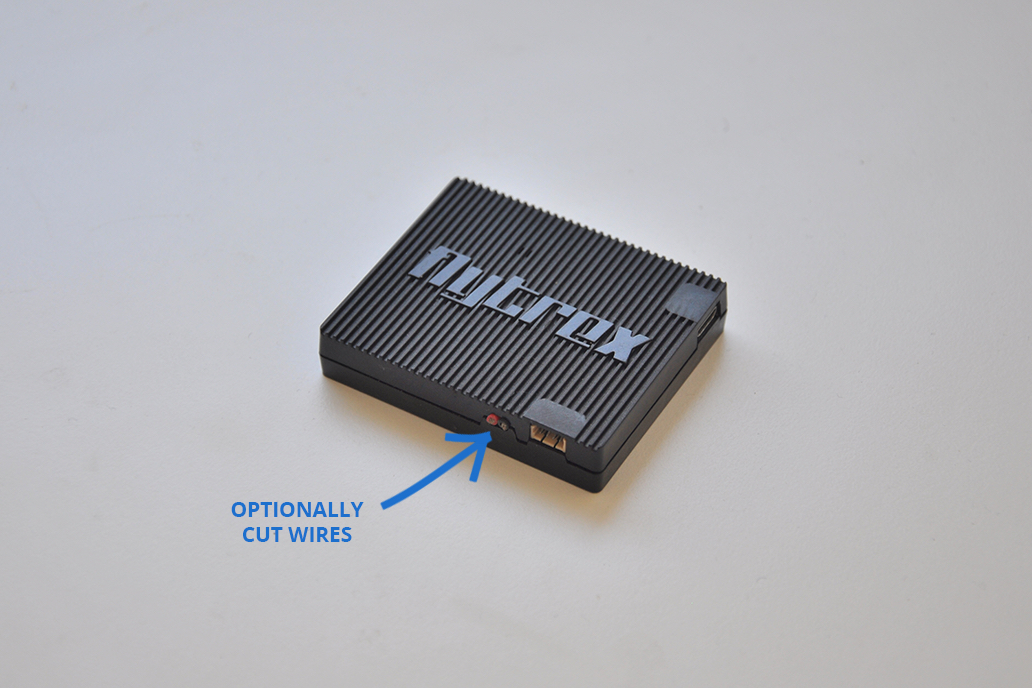
Remove Flytrex Live Power Wires
When connecting the Flytrex Live using the CAN-BUS Adapter the power wires (red and black wires coming out of the Flytrex Live 3G) are redundant. As seen in the picture below, we have cut the two wires off completely. If you believe you might install the Live 3G without the CAN-BUS Adapter in the future we recommend that you keep the wires but secure them in place using a tape.
Whether you cut them or secure them aside using a tape, make sure the red and black wire ends do not touch each other to prevent them from shorting the Live. This can be done easily by placing individual piece of tape on each of their ends to prevent them from short. Cutting the wires completely prevents them from moving completely and guarantees that the wires won’t touch other. We then added tape on the wires we cut to prevent dirt and dust from entering.
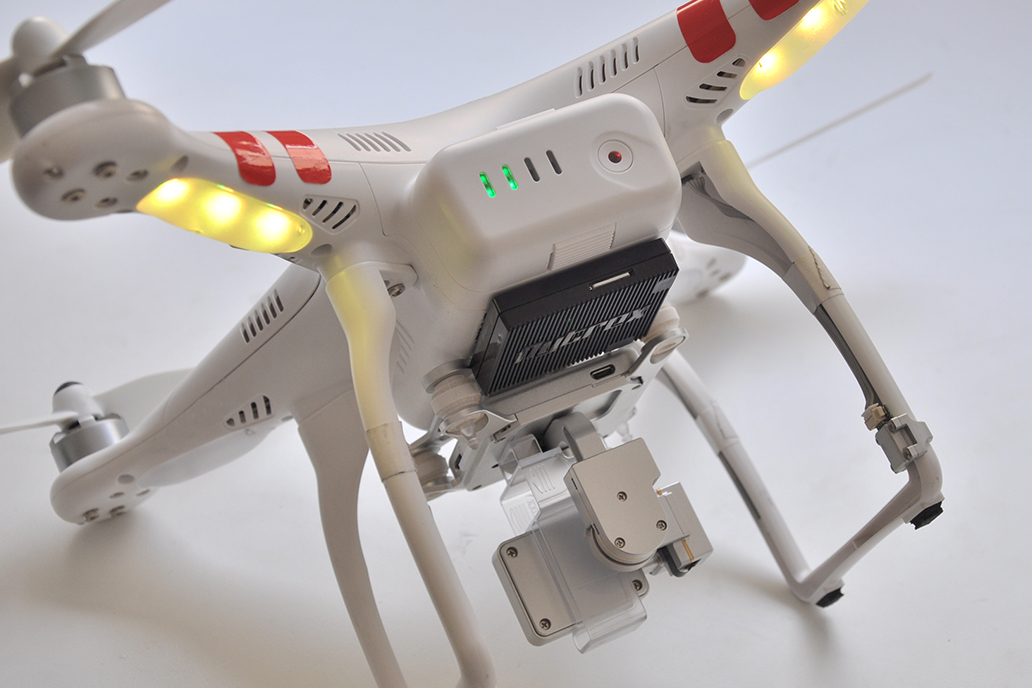
Connect and Mount Flytrex Live 3G
Connect the Flytrex Live 3G system to the black wire we routed to the outside of the shell earlier to it’s matching socket (there is only one matching socket like this). Mount Flytrex Live 3G using the four 3M double-sided adhesive mounting pads included with the Flytrex Live package.
All Set
That’s it! Before taking off for the first time, power your Phantom and see that the Live LED turns flashing green after initialization. This indicates the real-time flight data is now streamed automatically to your Flytrex account.
You can get the new CAN-BUS adapter from Flytrex at a special introductory price of $39.99 now! Just click on “Buy Now” on the main landing page and your cart will open with all the platform types. Select your platform to get the CAN-BUS adapter for your particular multirotor. If you already have aFlytrex Live 3G, you can just set the quantity for that item to 0 (zero) and buy the CAN-BUS adapter only. If you don’t have aFlytrex Live 3G yet, you can buy one with a special Dronethusiast discount. The 3G tracker normally costs $189.99 but now you can get a Live 3G with a 20% discount, for $151.99 only. Of course if you would like both items, it makes sense to get them at once to save on shipping costs.
What’s Included
The Flytrex CAN-BUS Adapter includes the adapter itself and 2 black installation cables used to connect the Live 3G to the adapter (one spare).
The adapter dimensions are 2.6cm x 2cm and weighs 7 grams. The cable is approx 2 grams.
Kennedy Martinez
kennedy@dronethusiast.comKennedy Martinez is a resident writer who joined Dronethusiast at the beginning of 2019. She has years of experience reviewing drones and other tech products. When it comes to flying drones, Kennedy loves the ability to create artistic videos from a unique point of view. Kennedy enjoys researching new drones and other exciting products that are available to consumers which is why she is committed to creating the best buyer's guides for our readers.

