How To Install Flytrex Live 3G on Your DJI Inspire 1
I never denied that I am a great fan of the Flytrex Live 3G tracking unit for UAVs. I have one installed on each of my quads and even our new X8 octo we put recently into order has one, so we always have an extra reference source of data for insurance purposes. This way we have an automated log of each flight including flight path, telemetry data, time stamp everything. And this is important because on a movie set, we would not be able to even remember to turn something on when there is a mad rush to complete all the takes.
And this is one of the reasons why it is important to have a system that seamlessly integrates with your flying platform. There are some devices out there that offer similar functionalities to those the Flytrex Live 3G offers. Heck the Inspire 1 and Phantom 3 units even have some functions integrated into the software application and the quad itself while the old Phantom 2 also had a “Find My Phantom” function. The problem with these functions is that they are great when all your system perform perfectly and the quad has GPS lock. The problem comes when the worst kind of flyaway happens, in case your quad loses GPS lock which can happen due to several reasons such as external interference. Another type of dreadful flyaway is when your quad records a home point two states away next to Aunt Mary’s house and tries to Return To Home there. In this case, your quad will fly as long as it has battery power and than land. In this later case, you might have a chance to recover your quad at the end of the recorded route your app shows, but when you lose GPS lock, the quad will simply not be at the “last seen” position. Last seen will equal last position when the bird had GPS lock. And here is the key. Most hobby grade quadcopters need to “see” 6 satellites to have GPS lock, while the kind of GPS units the Flytrex Live 3G has will pretty precisely position your quad with as little as 3 satellites being available. The new GLONASS capability is great to assure the highest chance of having a GPS lock, but at the moment, the vast majority of quads out there do not have this function just yet.
Before the release of the Phantom 3, I was shrewd enough to sell may Phantom 2 and the Flytrex unit went with it. I was flying an old Phantom 2 Vision with a retrofitted 2D gimbal (yikes) for a few weeks and it was a really funny feeling not to have the comfort of the Flytrex Live 3G watching out for my quad and making sure that I can at least recover the wreckage to give it a proper burial in case things go sideways (pun intended). So when I recently got my Inspire 1, I wanted to make sure that I install Flytrex Live 3G on it as soon as possible. It is a much more pricy unit than my Phantom 2 was, so I kinda felt “naked” flying without it. Again, it’s much better to have the wreckage available even if it’s not salvageable because you can at least send something to the manufacturer to check and decide if you are good for an RMA.
Besides the piece of mind of making sure I know where my quad goes, I also love the social functions of the Flytrex cloud based community and found lots of local pilots to mingle and make friends with. But that part is all covered in my previous post when I did a hands on review on my old Phantom 2 unit.
When I saw how easy it is to install Flytrex on the Inspire 1, I was amazed. My first Live unit had to be installed by soldering the cables and opening up the entire top part of the Phantom. Ok, it’s just two wires, but there are many pilots out there reluctant to do it in fear of screwing up something or losing warranty. It’s really easy to do, anyone can do it in a matter of 10 minutes or so. See below how you can do it yourself!
If you would also like to get a Flytrex Live 3G for your Inspire 1 or other device, I have great news for you! Dronethusiast readers can now get a special $38 discount on the Live 3G! This way you can grab the black box here for $151.99 instead of the regular $189.99 price tag.
What You Need to Install Flytrex Live 3G
To get started you will need your Inspire 1, your Flytrex Live 3G for Inspire 1 and the Flytrex Inspire 1 Installation Adapter. The Flytrex Inspire 1 Installation Adapter includes the small adapter itself and the two required cables that you’ll need for the installation. If ordering Flytrex Live from our site you will be asked what aircraft model you use, select the Inspire 1 and our site will automatically add for you the Inspire 1 Adapter. If ordering from a local dealer make sure to include the Flytrex Inspire 1 Installation Adapter together with your Live 3G, this includes all the parts you’ll need.

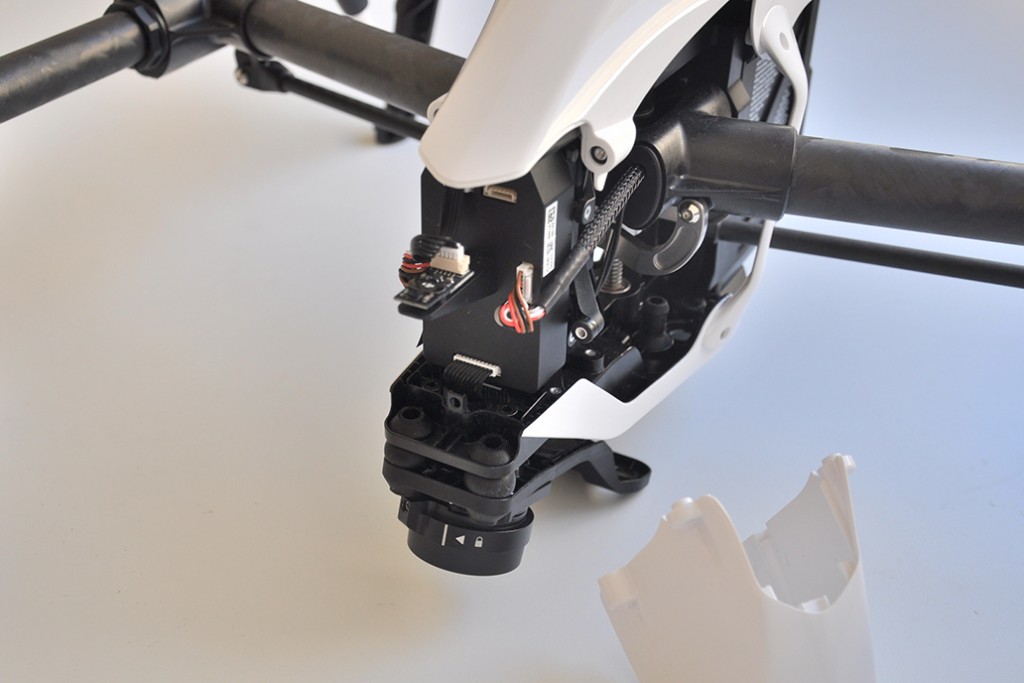
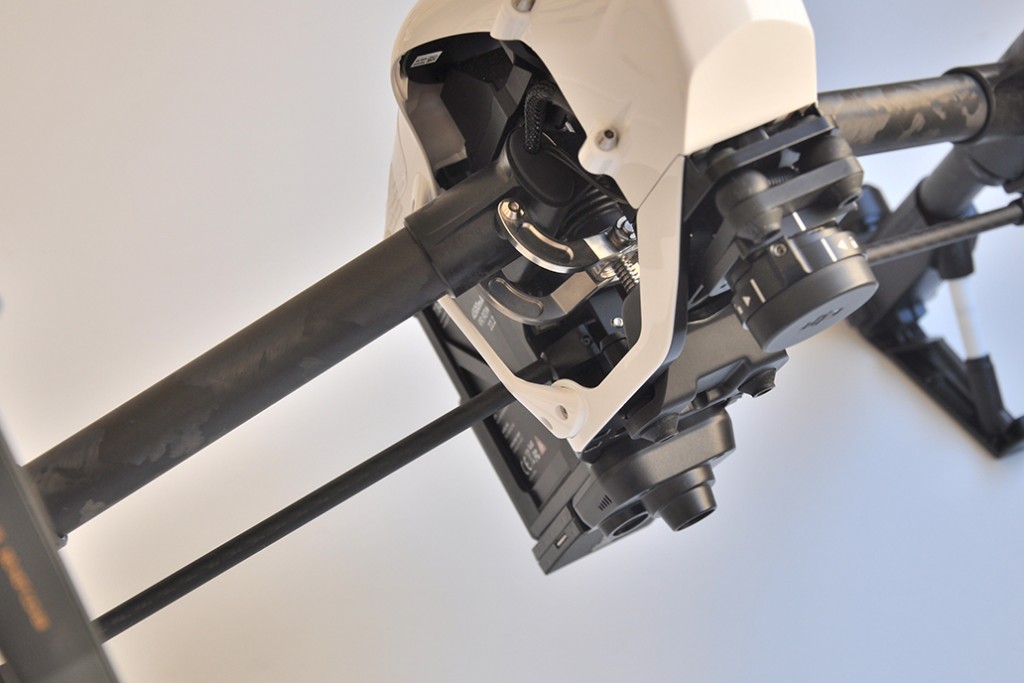
Open Front Canopy
Start by removing the front canopy of the Inspire 1. Removing the front canopy is not within the scope of this manual, but you can find many videos online that will show you how to do it. The front canopy is the easiest part to remove and takes about a minute or two. See this video to learn how to remove the Inspire 1 front canopy. Although this video shows how to remove other parts of the canopy as well, you’ll only need to remove the front part, which is the easiest part to remove.
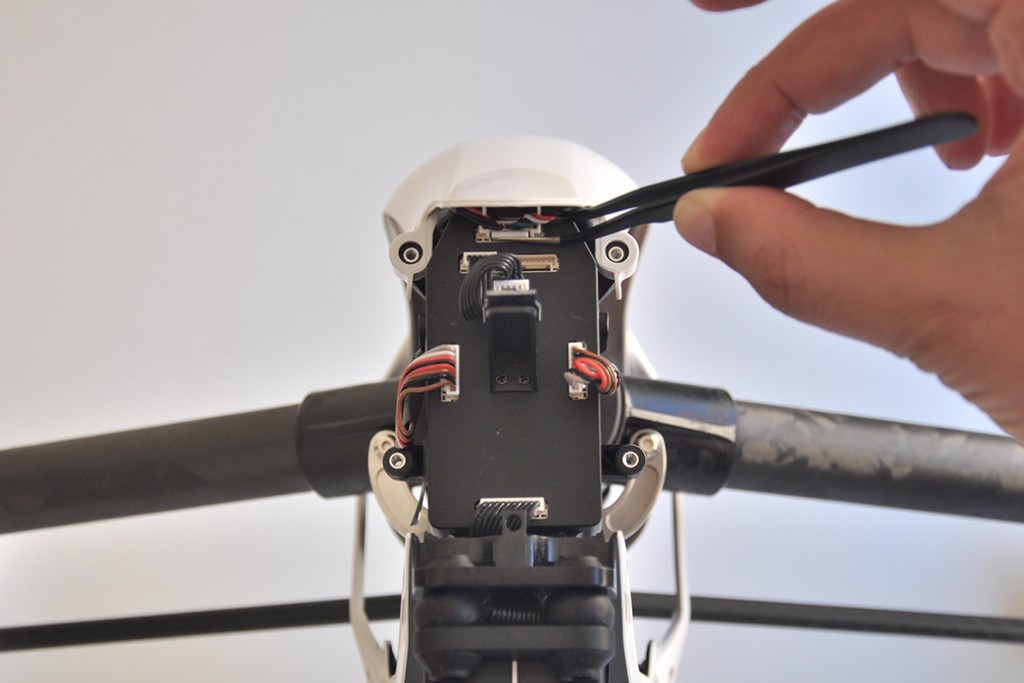
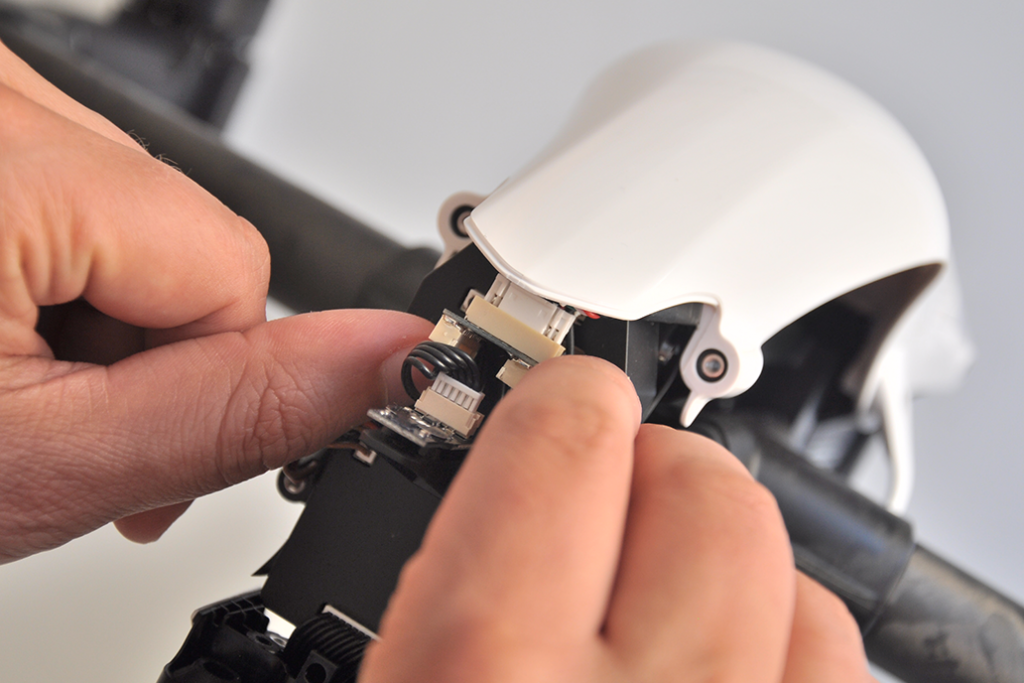
Disconnect Top Wire
Using a small pinching tweezers disconnect the top connector from the Inspire 1 front panel, as shown in the picture below. Disconnecting the wire requires a slight pull while pressing the connector bridge at the same time. Notice that the connector wire is positioned rather tightly so it should only go out a bit from its current position. See the following step picture for more details.
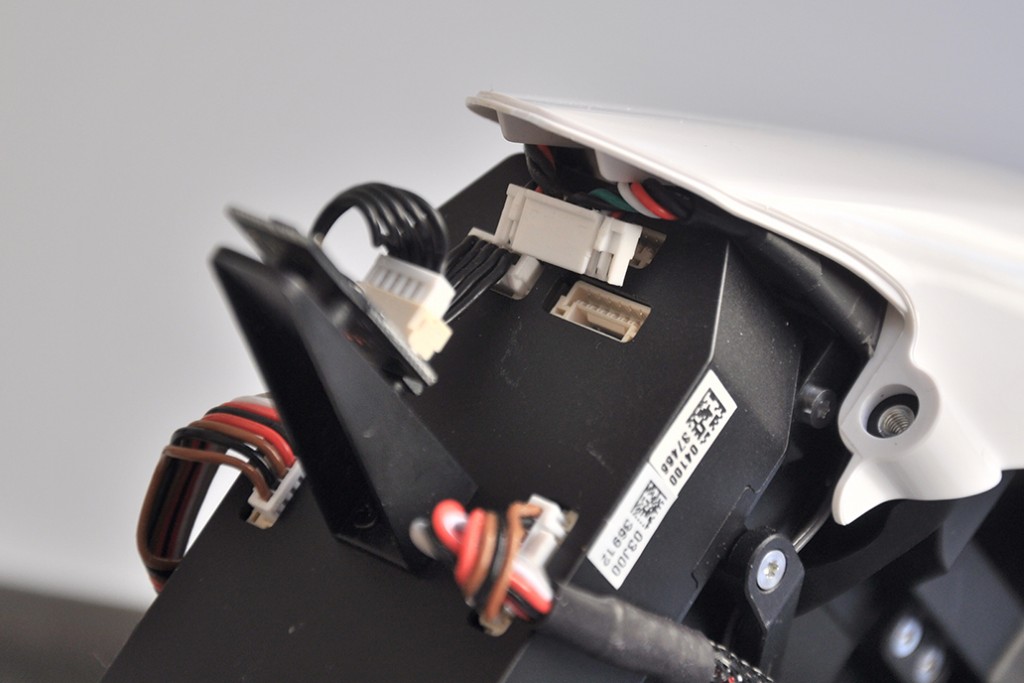
Disconnected Top Wire Position
After disconnecting the top wire the connector should be releasing and facing downward, as shows in the picture below.
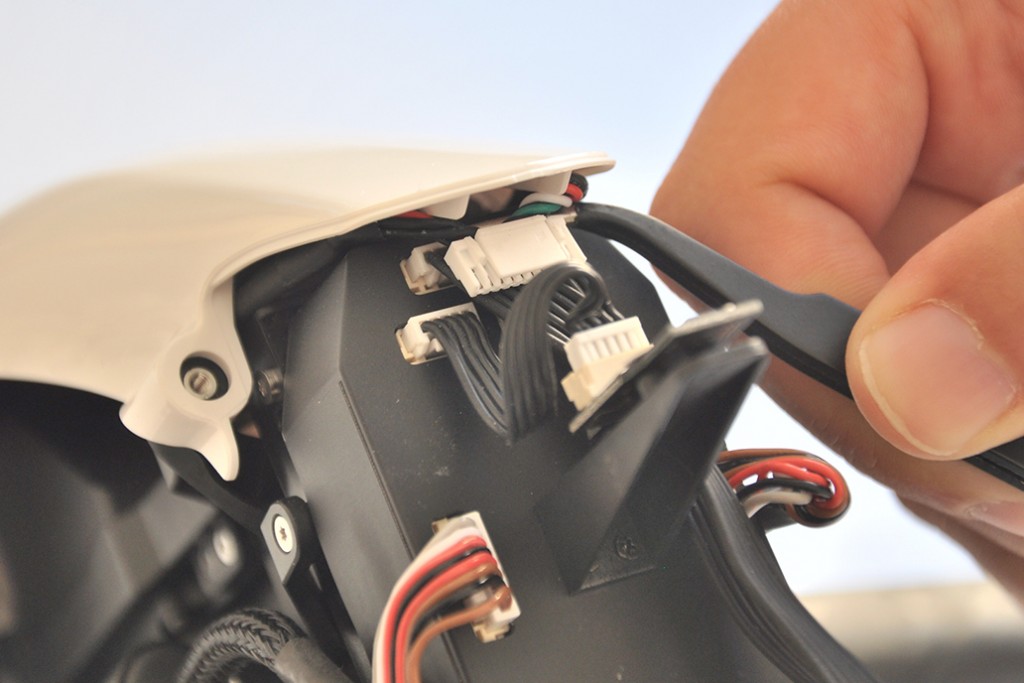
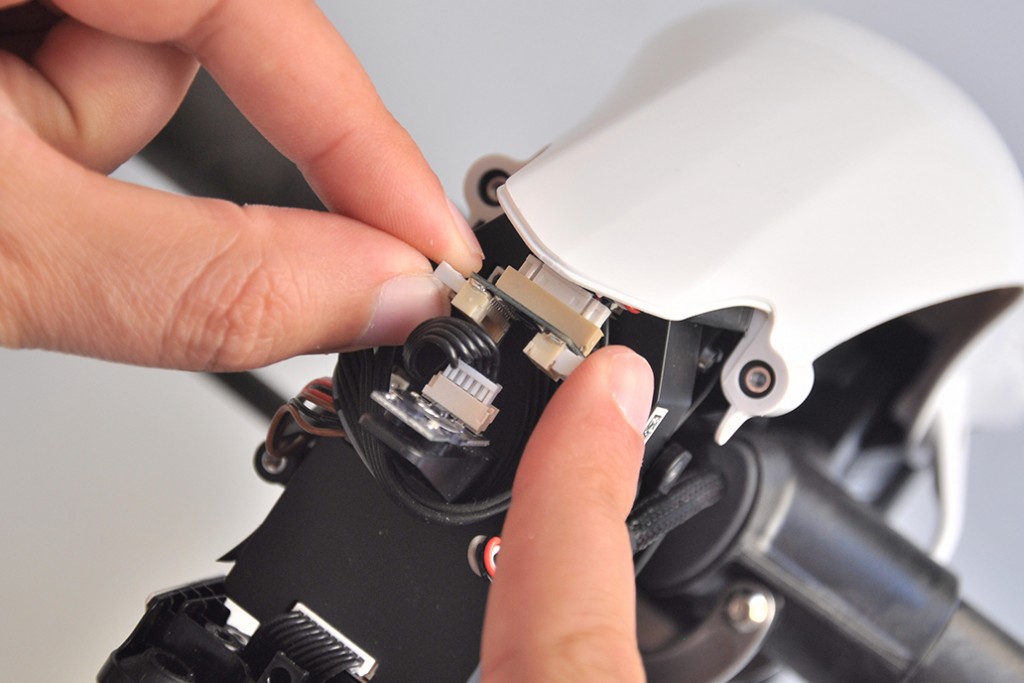
Connect Flytrex Adapter Wire To Front Panel
Take the short 10-pin wire included with the Flytrex Inspire 1 Adapter, gently bend its wire to 90 degrees at one of the ends of the connector and slide it behind the Inspire 1 connector we just disconnected and connect it to the same slot that we disconnected in earlier steps. Once positioned correctly gently push it in to place. If needed, give it another small push with two fingers from each side until hearing a click sound, this indicates that it was fully inserted. The picture below shows the result with the Flytrex Inspire 1 cable connected behind the wire we disconnected earlier.
Connect Inspire 1 Adapter
Connect one of the sides of the long 4-pin cable included with the Inspire 1 Adapter to the adapter itself. It doesn’t matter which side you connect to the adapter.

Mount Inspire 1 Adapter
Take the Inspire 1 Adapter and connect the 10-pin slot to the Inspire 1 cable we disconnected at the very beginning. To connect it gently push the Flytrex Inspire 1 Adapter to the free connector. You can use two fingers from each side to secure the connector in to place. This needs to be connected to the 10-pin slot on the Flytrex Inspire 1 Adapter side that includes the single connector and not the side including the two connectors).
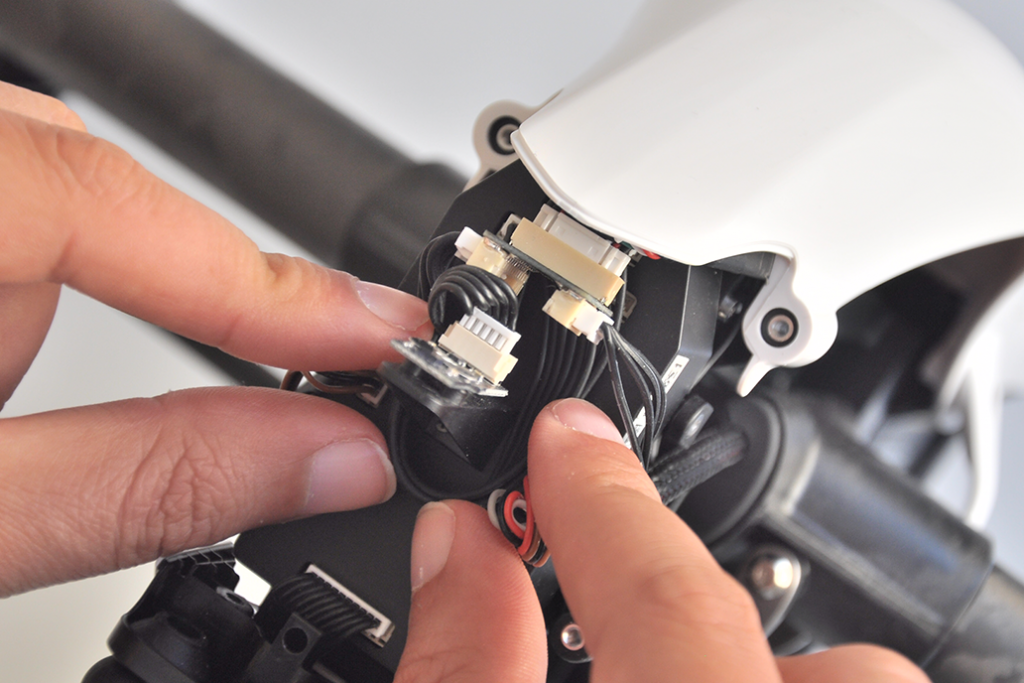
Final Adapter Connection
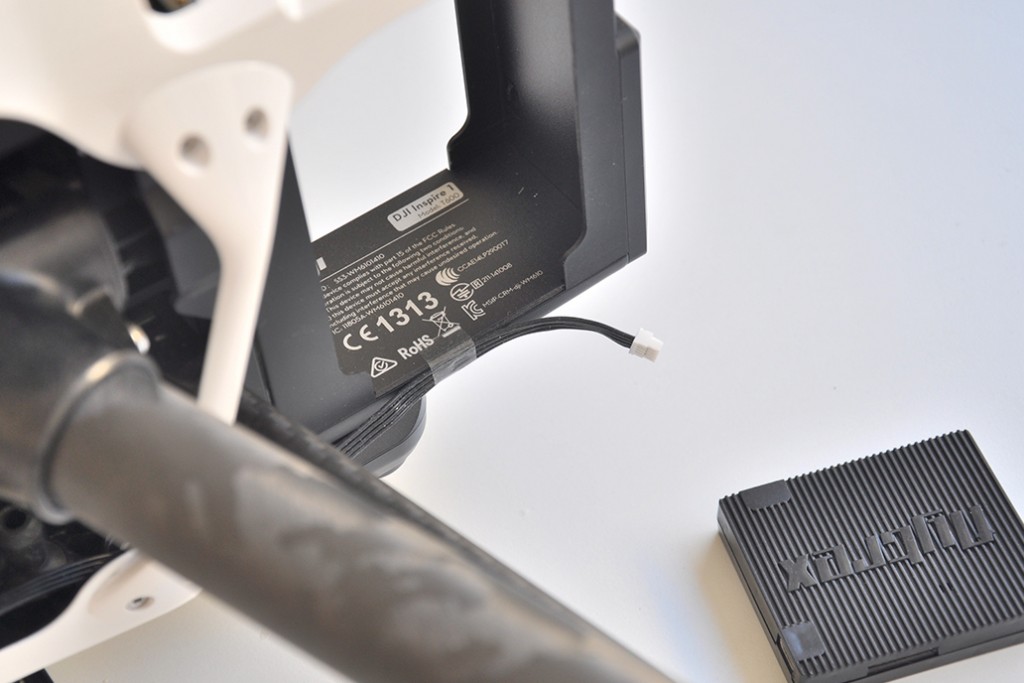
To complete the Flytrex Adapter connection take the loose end of the short 10-pin wire we connected in step 5, route it in circle around the font pole on the Inspire 1 and connect it to the last free connector on the Flytrex Inspire 1 adapter.
Adjust 10-Pin Wire Routing
After connecting the last wire around the front pole, use your fingers to nicely route the wire closer to the back of the front canopy. If the wire is still a bit loose this is OK, just route it around the front pole as seen in the picture below so that the front canopy will close smoothly.
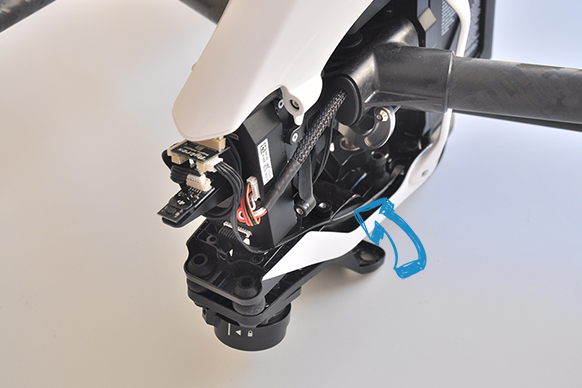
Route Long Adapter Wire
Route the long 4-pin wire that we connected in step 6 though the frame as shown in the picture below. At the bottom inner side of the frame you will see two holes, one in each side, route the wire through this hole to get the wire to the back part of the aircraft. This is where the Live 3G will be mounted. Use small piece of tape to secure the wire around the place marked in blue arrow in the picture below.
Secure Long Adapter Wire To Back
Use another small piece of high quality tape to secure the wire at the back side of the Inspire 1 as seen in the picture below.
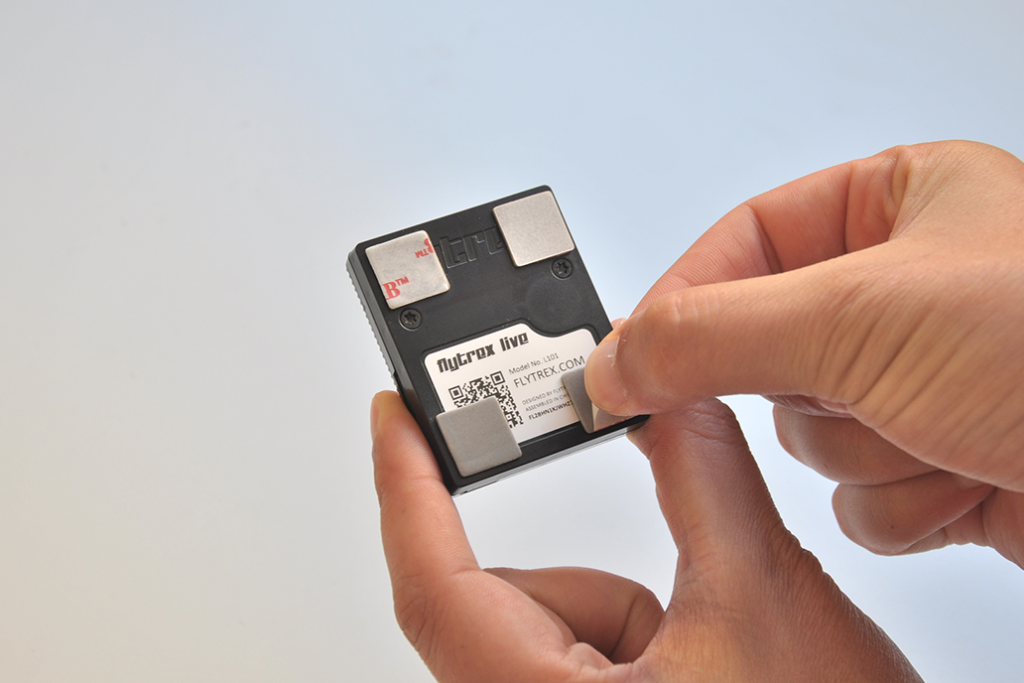
Mounting Pads
Before mounting the Live, Register your Live with your Flytrex account if you haven’t already. After mounting, the QR code containing your Live ID will be hidden making it impossible to register.
Included with your Live package you will find four 3M double sided adhesive mounting pads. Flip the Live system and place each of the four pads at each of the corners. We recommend keeping a bit larger gap from the sides of the Live box from what seen in the picture since the Inspire frame is just a bit narrower than the Live. Peal all four pads, flip the Live again and position it behind the optical flow sensor. The Live system fits perfectly to the Inspire 1 frame and the Inspire 1 case.
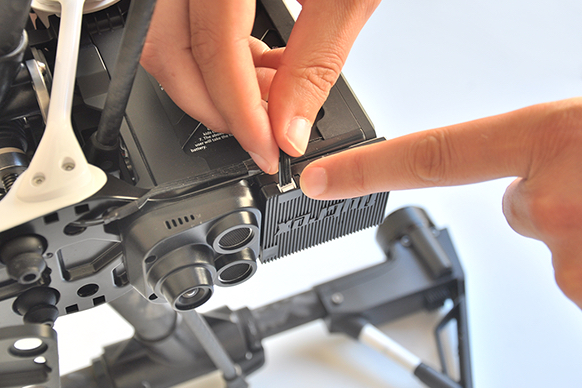
Connect Flytrex Live
Connect the other side of the long 4-pin wire to the Flytrex Live data port.
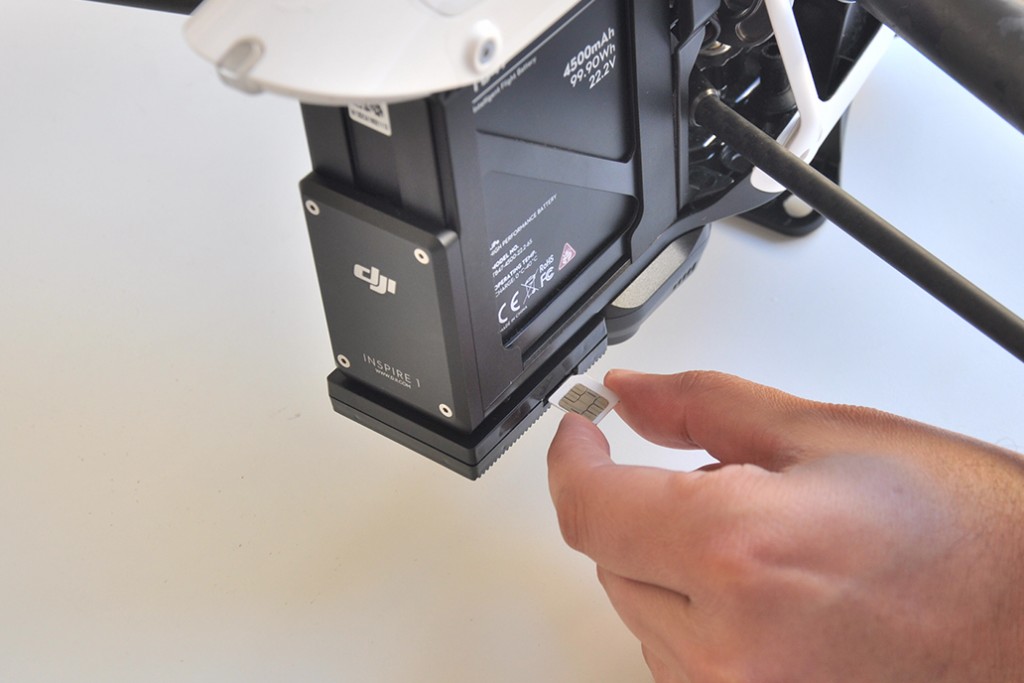
SIM Card
Insert a SIM with data plan to your Live system. See image below showing the correct direction of the SIM. See here for more details about the required SIM card.
All Set
That’s it! Your new Flytrex Live 3G will now create a range-free, real-time, GSM data connection automatically each time you go flying. Before taking off for the first time, power your Inspire and see that the Live LED turns flashing green after initialization. This indicates the real-time flight data is now streamed automatically to your Flytrex account.

Kennedy Martinez
kennedy@dronethusiast.comKennedy Martinez is a resident writer who joined Dronethusiast at the beginning of 2019. She has years of experience reviewing drones and other tech products. When it comes to flying drones, Kennedy loves the ability to create artistic videos from a unique point of view. Kennedy enjoys researching new drones and other exciting products that are available to consumers which is why she is committed to creating the best buyer's guides for our readers.


Hi,
Having a Inspire1, I was looking for a decent tracking tool until I came along this post.
However, before taking a Flytrex Live in, I do have a question.
Is it correct to say that the Flytrex is not using its own GPS but the one of the aerial platform? In the later case, if the quad loses GPS lock, which probably means something is wrong with your unit, you still won’t be able to track it down as it refers to an incorrect reading/data from the GPS unit.
Rgds,
eMixam
Hello eMixam. No, the Flytrex unit uses both its internal GPS unit as well as the information from the onboard GPS and telemetry as well. This way if your bird goes haywire losing GPS lock, it will still track the last location where it was powered on. It does not have an onboard power supply, so it will not track your device if someone picks it up for example, but so far this is the most precise tracker to ensure you find your lost quad. Plus it has social functions, live broadcast of your flight on Google Maps, etc. so it is actually a lot more than just a tracker. Check Lynh Phan’s hands on review, it says it all. Be sure to use the link provided so you can get the 20% discount.
My first flytrex live 3g was for my phantom 2 h3-3d. Then i bought a phantom 3, i tried to use my phantom 2’s flytrex but it didn’t work which required me to get the new flytrex. I also have the Inspire 1 now. is the inspire compatible with the old flytrex or do i have to use the new flytrex?